Crocheted Cloche Hat
I've set up a mirror of this page at http://www.fmfcorp.com/familyspot/cloche-hat.html. It seems that there have been some link problems at this site. If you have any problems with this page, try the other site instead.
General directions:
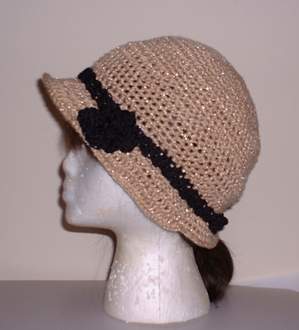
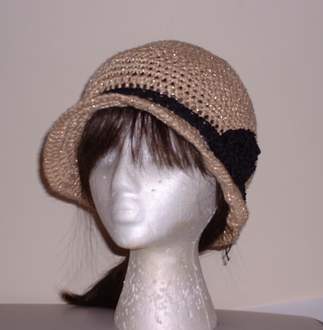
So here is the famous hat that I fudged my way through! I was aiming for a 1920's style close fitting cloche with a flared brim. The one pictured above is made with Lion Brand Glitterspun with a size I9 (5.5mm) crochet hook. The band and flower were made with some nylon cord that I had leftover from a beret. These measurements will make a hat that will fit my head (and it's a big head!). Customize it to fit your own head. Just keep trying it on - if it is too large or too small, go back a few rows and either remove some rows or increases, or add some. :-)
As I am very new to crocheting, these are general instructions, rather than an exact pattern. Hopefully they'll be helpful anyway. Maybe some day I'll come back and count out stitches and figure out gauge and all those exciting goodies.
To create the crown:
Chain 4 stitches, join with a slip stitch to create a circle. Then single crochet, increasing to keep it flat - like the beginning of a beret or a kippah until it measures 6 1/2 inches. For directions to make a beret see this link at CrochetPartners.com: Custom Beret
To create the stand (the sides of the hat):
Then continue rounds without increasing for a depth of about 3 1/2 inches. In my sample hat I alternated rows of single crochet with rows of half double crochet a few times. Single crochet all around will give more coverage, and be warmer. Double crochet would have more ventilation :-)
For the brim:
 Single crochet for about 15 stitches without
increasing. Then switch to double crochet,
increasing every 6 stitches. Switch back to
single crochet, no increases for the last
15 stitches of the row. Continue rows in
this pattern, but increasing every 7, 8, 9
and 10 stitches in the double crochet portion
for 4 more rows. Then finish off with a row
of single crochet, no increases all around.
Single crochet for about 15 stitches without
increasing. Then switch to double crochet,
increasing every 6 stitches. Switch back to
single crochet, no increases for the last
15 stitches of the row. Continue rows in
this pattern, but increasing every 7, 8, 9
and 10 stitches in the double crochet portion
for 4 more rows. Then finish off with a row
of single crochet, no increases all around.
Band and rose:
The rose came from a scrunchie pattern, again at CrochetPartners.com: Springtime Flowers Scrunchie The second one on the page. I attached it to a band of four single crochet across crocheted in the back loop only.
Extras:
To make the hat fit snugly, I wove a strand of elastic cord through the last row before the brim (on the inside). If you make the band snug enough, this probably isn't necessary. To give the brim more shape I wove a length of thin wire (I got it from the jewelry section of the craft shop) through the final row of the brim.
Variation:
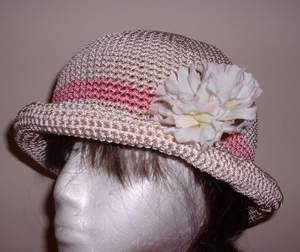
To make a bowler hat, I used J&P Coats Crochet Nylon cord.
I made the whole hat in single crochet and changed color to create the band.
I made the brim thusly:
First row: Increase in every stitch all the way around.
Rows 2-7: single crochet in each stitch around
Row 8: Decrease in every stitch around.
And I added a flower from the craft shop.
Copyright April 2003. For personal use only.
Like the page? I love compliments! Leave me a line or two in my
guestbook. I especially like to know how you found us.

View My Guestbook
Sign My Guestbook
Links to other hat patterns
Back to Another Family Spot