- Chain 3
- Chain 3 (for one dc) ch 2, 1 dc in first chain loop that you made, repeat ch 2, 1 dc in loop until you have 10 dc in loop including the chain, ch 2, join in top of ch 3 (from beginning of row)
- Slip stitch into the first ch 2 of previous row, ch 3 (for one dc), ch 2, dc in same ch 2 of previous row, ch 2, repeat increasing in each ch 2 of previous (dc, ch 2, dc), ch 2 between each one
- Follow the above row increasing in the following way - (dc, ch 2, dc) ch 2, dc in ch 2 of previous row, (dc, ch 2, dc), etc. to end of row
- Repeat above by adding space between (dc, ch 2, dc) - i.e. ch 2, dc in ch 2 of previous row, ch. 2, dc in ch 2 of previous row (dc, ch 2, dc), ch 2 Keep doing this by adding one more "space" until you have made the liner large enough to lay nicely on your head (put the center at your crown and work out that way) - make sure that you don't get too many increases, you don't want any bumps - and the mesh will stretch over time.
-
Once you have it the right size for you
(usually between 8 and 10 rows of dc ch 2, etc.),
(ProudMommy's note: For my big head and a 1.5mm hook, I needed 14-15 rounds)
You will want to put a few straight rows in there to make
the "bend" with the head. This can be done by the
following:
Ch 3 for one dc, ch 2, dc in ch 2 of previous row, ch 2, dc in ch 2 of previous row, ch 2, etc.
I do this for about 5 rows. - Makes the liner a nice size.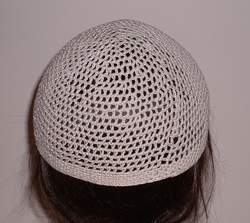
-
Now I put the finishing edge on so that it makes it
tighter and this is the part that will actually keep
it on your head.
I do 9 rows of: ch 2, sc in ch 2 of previous row, ch 2, etc. - Then I finish it off with one row of: ch 2, sc in ch 2 of previous row, ch 1, sc in ch 2 of previous row, ch 1
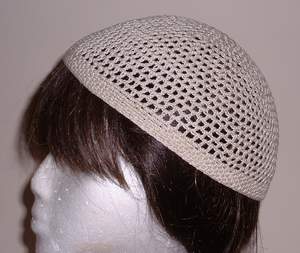
Shoshie's Crocheted Scarf Liner
I've set up a mirror of this page at http://www.fmfcorp.com/familyspot/scarf-liner.html. It seems that there have been some link problems at this site. If you have any problems with this page, try the other site instead.
This has been a revelation! Those of us with fine hair will all recognize the problem of scarf slippage. How on earth can we get them to stay put? Well, Shoshie has an answer that has worked like a dream for me.
"I make crocheted scarf liner that is big enough to fit over my head (sort of like the size of a bukhara kippah or one that is usually worn by kids at night when they sleep). This helps prevent any slipping of my scarf or snood, plus I don't have to worry about trying to tie my scarf tighter and making me feel like I'm cutting off the blood flow to my brain! LOL
It's quite easy. Use crochet cotton (white or cream works well because then there is not a distinct colour peeping through your scarf should the light shine on it). I use about a 1.75 crochet hook." (ProudMommy's note: I used size 10 crochet thread, with a steel crochet hook, American size 8 (1.5 mm). I think 1.75 would be between a 6 and a 7, but 8 is what I had handy!)
The Pattern:
Working in rounds
"This is all again, trial and error according to your head size. My best advice to you is keep trying it on as you work on it.
Have fun working on it - you'll find that it doesn't take but a few hours to whip it up once you have done one that fits well. I also like making one that is a little longer and it making crochet lace around the edge of the front and it makes a nice front piece for my forehead that peeks out from underneath my scarf. This is excellent too in case your scarf slips back, it really looks attractive and since it is done in a tight stitch, no one can see your hair anyway."
Copyright April 2003. For personal use only.
Like the page? I love compliments! Leave me a line or two in my
guestbook. I especially like to know how you found us.

View My Guestbook
Sign My Guestbook